The best GTA 6 settings on a PS5 start outside the game, in five console menus that decide whether the install finishes, the sound places itself properly, the controller suits you and the screen shows what the artists drew. The game then brings seven tabs of its own.
Grand Theft Auto VI reached PlayStation 5 at midnight local time on November 19, 2026, running at 30 frames per second on the standard console and the Pro alike. Work through the console layer first, starting with the 212 GB install and ending with the display.
What You Need Before You Start
- A PS5 or PS5 Pro, because the game does not run on PS4.
- System software that is current, or the download will not begin.
- A DualSense controller for the vibration and trigger sliders.
- Headphones, or a TV whose speakers can be measured by the controller microphone.
- A display with HDMI 2.1 VRR support if you want the last step to do anything elsewhere.
Each one is a toggle or a slider, and each can be reversed later from the same menu. Four of the five keep working for every other PS5 title you own, which is why they repay the quarter hour.
Which GTA 6 Settings Should You Change on PS5 First?
Begin with Storage, system software and Auto-Download so the install is complete, then create a 3D Audio profile, tune the DualSense sliders, calibrate HDR and leave VRR switched on. Because the frame rate never moves off 30, every one of them works on comfort and on how the world reads.
Best GTA 6 Settings for PS5 and Where They Live
| # | Do this | Where to find it | Why it matters in GTA VI |
|---|---|---|---|
| 1 | Storage, system software and Auto-Download | Settings, then Storage and Settings, then System | The game needs up to 212 GB |
| 2 | 3D Audio | Settings, then Sound, then 3D Audio | Spatial sound is built for Tempest 3D Audio |
| 3 | DualSense intensity | Settings, then Accessories, then Controller (General) | Haptics run through the whole game |
| 4 | HDR and Adjust HDR | Settings, then Screen and Video, then Video Output | Controls brightness in night and sunset scenes |
| 5 | VRR | Settings, then Screen and Video, then Video Output, then VRR | Does nothing at a fixed 30 fps, but helps the rest of your library |
1. Storage and System Software: Clear 212 GB and Stay Current
Needs: 212 GB free | Path: Settings, then Storage | Also: Rest Mode and Automatic Updates
- Go to Settings, then Storage, and read the free space figure.
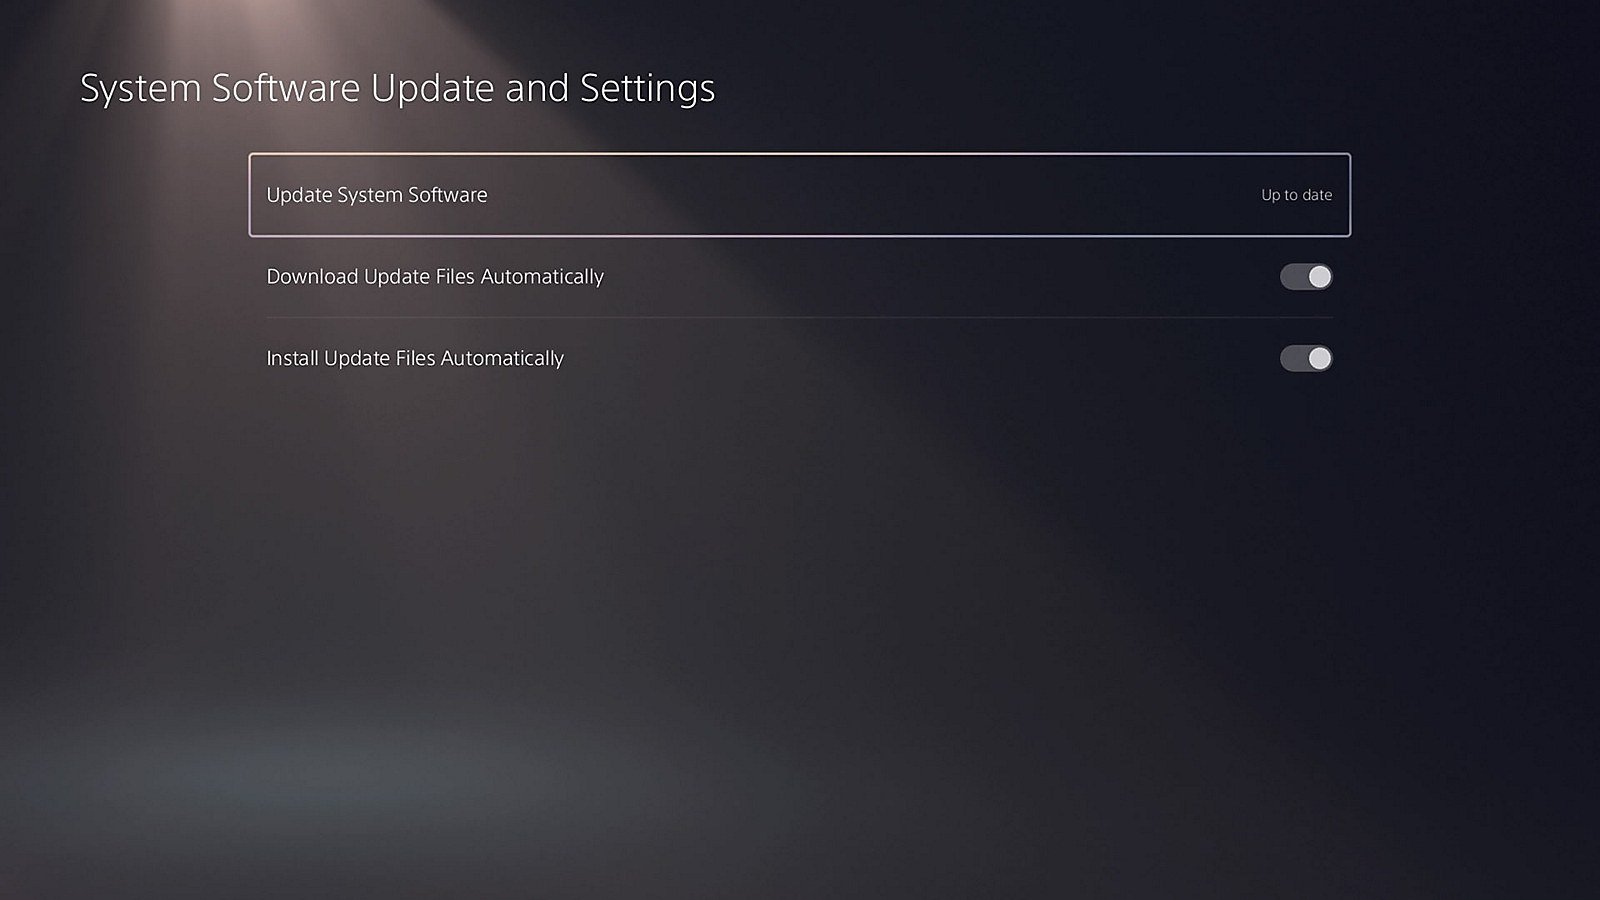
- Open System from Settings, pick System Software, and enter System Software Update and Settings.
- Enable both automatic options there, for downloading update files and installing them.
- Back in Settings, open Saved Data and Game/App Settings and choose Automatic Updates.
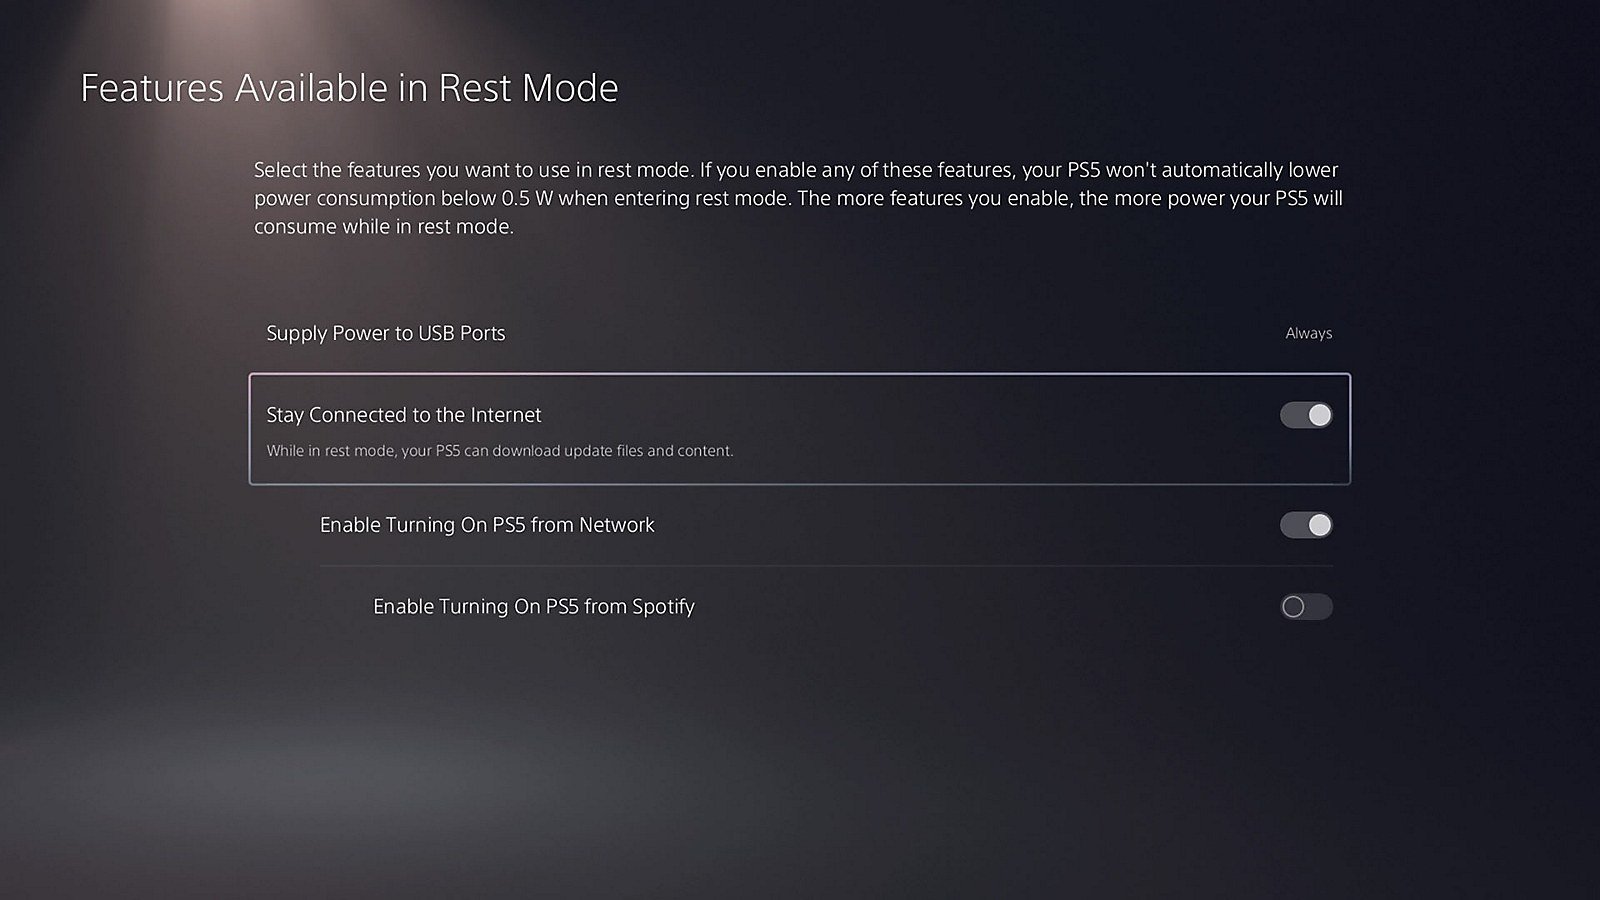
- Go to Settings, then System, then Power Saving, then Features Available in Rest Mode.
- Switch on Stay Connected to the Internet.
Physical copies are code-in-box with no disc, so every buyer downloads the same file, a package of up to 212 GB. Old system software stops that download before it begins, so rule that out the moment GTAVI sits motionless in Downloads/Uploads. Also in the Rest Mode menu, Enable Turning On PS5 from Network lets the PlayStation app and Remote Play wake the console.
Where a console is shared, the Console Sharing and Offline Play entry under Settings, Users and Accounts, Other needs enabling before a second account can load the game. If the console is short on room, an M.2 SSD must be PCIe Gen4x4 NVMe in the Key M format from 250 GB to 8 TB, and our NVMe vs SATA SSD comparison shows where the speed difference lives. Games cannot be played from USB extended storage, so move them back through Options and Move Games and Apps.
2. 3D Audio: Place Every Siren and Street Corner
Path: Settings, then Sound, then 3D Audio | Modes: Headphones or TV | Best with: a wired or wireless headset
- Choose Settings and then Sound.
- Open 3D Audio (Headphones).
- Select Create Personalized 3D Audio Profile.
- Answer the direction questions after each test sound.
- Select Apply Personalized 3D Audio Profile, or choose one of the 5 presets.
- Switch on Enable 3D Audio for Headphones.
The PS5 build has reworked spatial audio, so every sound in the world is routed through Tempest 3D Audio. In a dense city, helicopters overhead, a car pulling up behind you and a club thumping through a wall can each sit in their own place around the listener.
Playing through the TV speakers is the other route. Pick 3D Audio (TV), let the DualSense microphone sweep the room, and finish with the TV Speakers toggle. Repeat the sweep after a furniture change. A good headset gives the cleanest result, and our best gaming headsets guide compares seven of them.
3. DualSense Intensity: Set the Haptics You Can Live With
Path: Settings, then Accessories, then Controller (General) | Sliders: Vibration Intensity, Trigger Effect Intensity | Controller: DualSense
- Select Settings and then Accessories.
- Open Controller (General).
- Move the Vibration Intensity setting to your preferred level.
- Move the Trigger Effect Intensity setting to your preferred level.
Rockstar has woven detailed haptics into the entire game for DualSense, and the PS5 edition is marked for vibration, adaptive triggers and the controller speaker. The two console sliders cover every title that uses the feature, so they are the sensible first move before touching anything inside the game.
A second layer waits on the Controller tab in the game, where Vibration & Haptics Strength, Adaptive Triggers Resistance, Adaptive Triggers Vibration and an Adaptive Speed Limiter each sit on their own row. Back on the console, the job is done when both sliders on Controller (General) sit at your chosen levels.
4. HDR and Adjust HDR: Match the Screen to the Skyline

Path: Settings, then Screen and Video, then Video Output | Choices: On When Supported, Always On | Then: Adjust HDR
- Choose Settings, then Screen and Video.
- Open Video Output.
- Set HDR to On When Supported.
- Open Adjust HDR and work through the brightness steps shown on screen.
The game trades frame rate for visual density, and a calibrated HDR display is the cheapest way to see more of it. Adjust HDR enables fine brightness changes and optimised HDR rendering for the console as a whole, so it also improves every other game you play.
Always On is the alternative to On When Supported for a TV that handles HDR well in every title. To confirm, look at the HDR row for the choice you made and make sure the Adjust HDR prompts end without asking again. The game keeps a separate HDR Calibration step of its own, which runs after this one. A new screen is covered in our best TV for gaming guide.
5. VRR: Worth Having, Just Not for This Game
Path: Settings, then Screen and Video, then Video Output, then VRR | Needs: HDMI 2.1 VRR TV or monitor | Option: Apply to Unsupported Games
- Choose Settings and then Screen and Video.
- Open Video Output.
- Switch VRR on.
- Decide whether to keep Apply to Unsupported Games on.
VRR allows the refresh rate to move in real time on a TV or game that supports it, and the result depends on the display. A pinned 30 frames per second gives it nothing to track, so this is the one entry in the five that will not change how Vice City looks. It stays worth switching on for the uncapped titles sitting beside it.
Switch the sub-option off if you see unexpected behaviour. With VRR in use the console goes into low latency mode by itself, even with ALLM set to Off, and on PS5 Pro the feature is disabled at 8K output. The 120 Hz Output switch beside it follows the same reasoning at a 30 fps target.
The Settings Menu Inside GTA 6
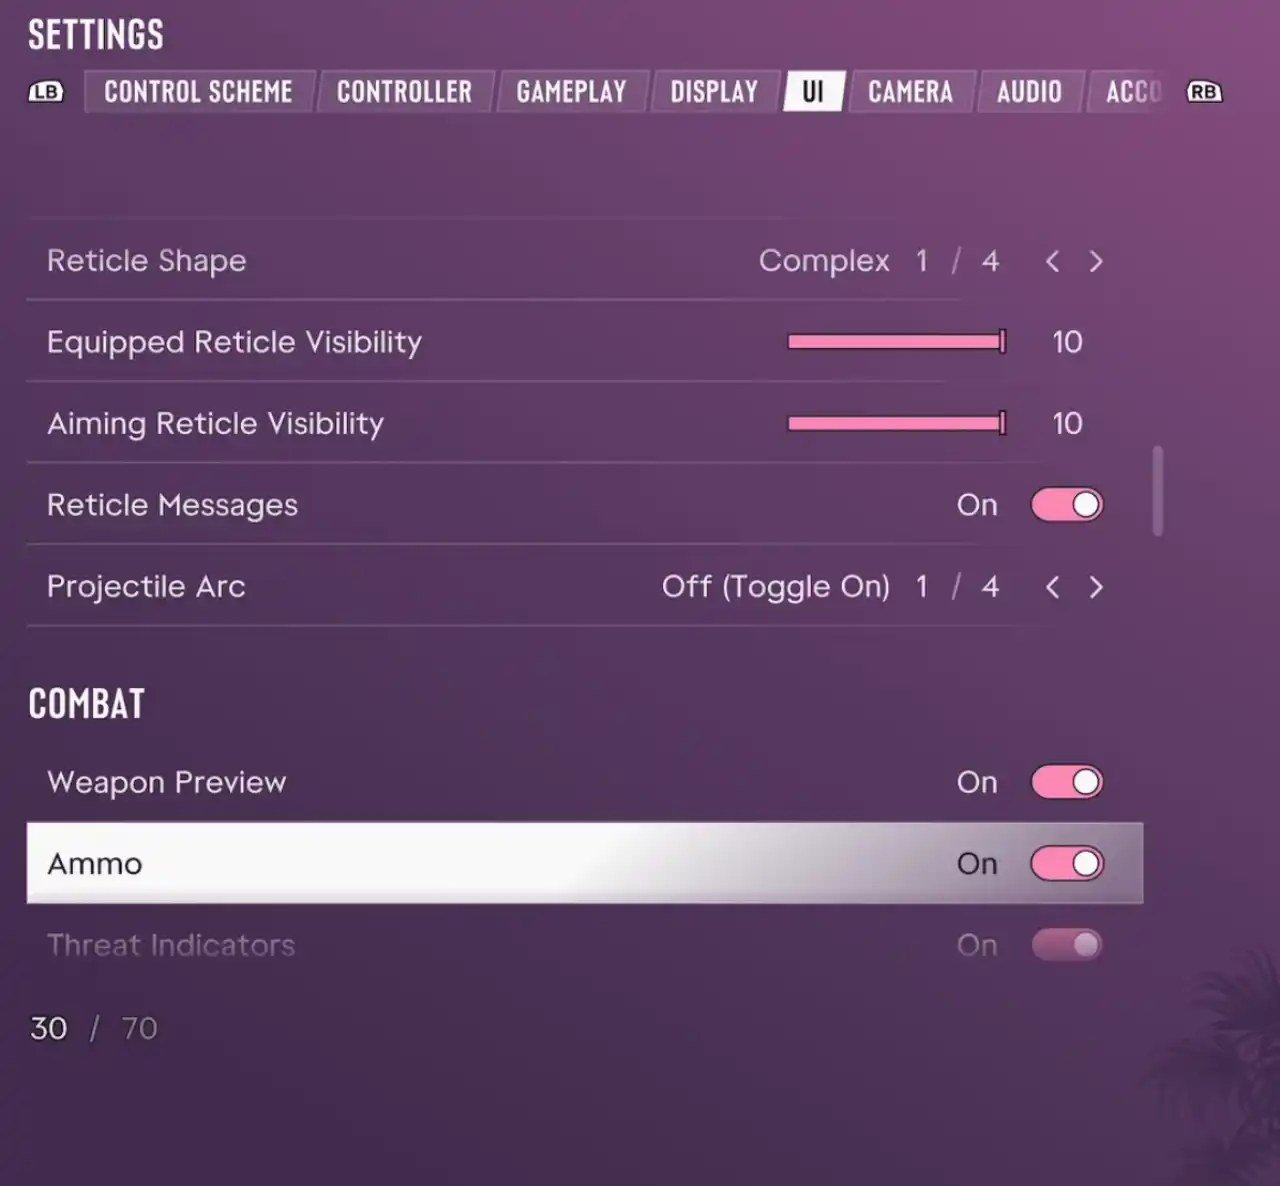
Settings sits in the pause menu, next to Map, Stats and Photo Studio, and opens on a row of seven tabs: Control Scheme, Controller, Gameplay, Display, UI, Camera and Audio. L1 and R1 step between them, and Circle leaves with your changes kept.
Control Scheme comes first for a reason. Default, Classic and a left-handed layout are the three choices, and the difference matters immediately: Default puts sprint on L3, while Classic restores the arrangement older Grand Theft Auto players have in their hands already.
Tab by Tab, What Actually Changes the Feel
- Display: HDR, HDR Calibration and Safe Zone sit under General. Motion Blur Strength is the row most worth moving, and its 0 end is the sharpest. Brightness Reduction, Colorblind Mode, Flashbang, Focus Trail and the player status, hit and awareness intensity dials round it out, with High Contrast Shaders separate.
- Camera: Camera Shake and Camera Bob under Comfort are the two that calm a busy screen. Height settings exist separately for on foot and for vehicles, and Cinematic Kill Shot Frequency, Cinematic Vehicle Crash Frequency and Idle Camera govern the automatic cutaways.
- UI: UI Text Size, a full Subtitles & Captions group covering Subtitles, Closed Captions, Size, Speaker Names and Background, plus Minimap, Compass, GPS Route and a Reticle group with shape, size and visibility rows.
- Gameplay: Targeting with its Partial option, Aim Assist Strength, Shooting Assist and Drive-By Assist under Combat, Movement Speed and Combat Movement Speed under Movement, and a long accessibility group holding Auto Drive, Accessible Combat and Simplified Mini Games.
- Audio: Master, SFX, UI, Dialogue, Music and Media volumes move independently, while the Setup group holds Mono Audio, Tinnitus Reduction, Controller Speaker, GPS Voice and Mute Licensed Music.
One thing is not in any of them. No tab in the game offers a frame rate, performance or resolution option, so the Display tab is about image character rather than image speed.
Accessibility Options Shipped With the Game
The PS5 release ships with thirty accessibility features. Every line of spoken dialogue carries a subtitle, every sound effect carries a caption, both come in clear and large variants, and anything audible can be mirrored on screen or through the controller instead.
Buttons can be remapped to an alternative preset, stick sensitivity is adjustable and either stick can be inverted on both axes. Nothing breaks if haptics and trigger resistance are switched off altogether. Difficulty scales, quick time events can be simplified, and an offline session pauses anywhere, cutscenes included.
Why Console Settings Carry More Weight at 30 fps
With the frame rate fixed, a player has no performance toggle to reach for, so the useful choices move to the console and to the Display, Camera and Controller tabs. A well measured room, a headset profile that fits your ears, a trigger that is not too stiff and a display set up properly all shape how the game feels during the first hours.
These choices also carry over. The audio profile, the HDR calibration and the controller sliders stay in place for every other PS5 game, which is why the effort pays back long after the first weekend.
How PS5 Pro Changes the Picture
PS5 Pro owners get improved clarity from PlayStation Spectral Super Resolution plus ray-traced shadows, with a compatible display required for both, and neither feature comes to the standard PS5. All five console settings are identical on the two models. Details of the console are on the PS5 Pro product page, and the PlayStation Store page for the game carries the editions.
Settings to Skip for GTA 6
- Game Presets: the preset only touches games that ship a Performance or Resolution option, so keep the default.
- Enhance PSSR Image Quality: a PS5 Pro option that is on by default, so leave it alone.
- 8K output and Video Transfer Rate: reach for these two only when the picture breaks up.
- Enhance Image Quality for PS4 Games: no use at all, given there is no PS4 version.
Frequently Asked Questions
Is there a performance mode in GTA 6?
No. Thirty frames per second is the figure on every console it shipped for, and not one tab in its Settings menu offers a performance, resolution or frame rate choice. PS5 Game Presets therefore has nothing to apply to it.
Which PS5 setting matters most for GTA 6?
Free storage matters most because the download needs up to 212 GB, with current system software close behind because an old console refuses to start it. After that, 3D Audio and a calibrated HDR display make the biggest difference you can control yourself.
What should I change in the game itself?
Motion Blur Strength on the Display tab, Camera Shake and Camera Bob on the Camera tab, and Vibration & Haptics Strength on the Controller tab. Those four shift how the game reads and feels more than anything else in its menus.
Can I use Remote Play for GTA 6?
Yes. The game fully supports Remote Play on PlayStation and Xbox. Switch on Enable Turning On PS5 from Network if you want the console to wake from the PlayStation app.